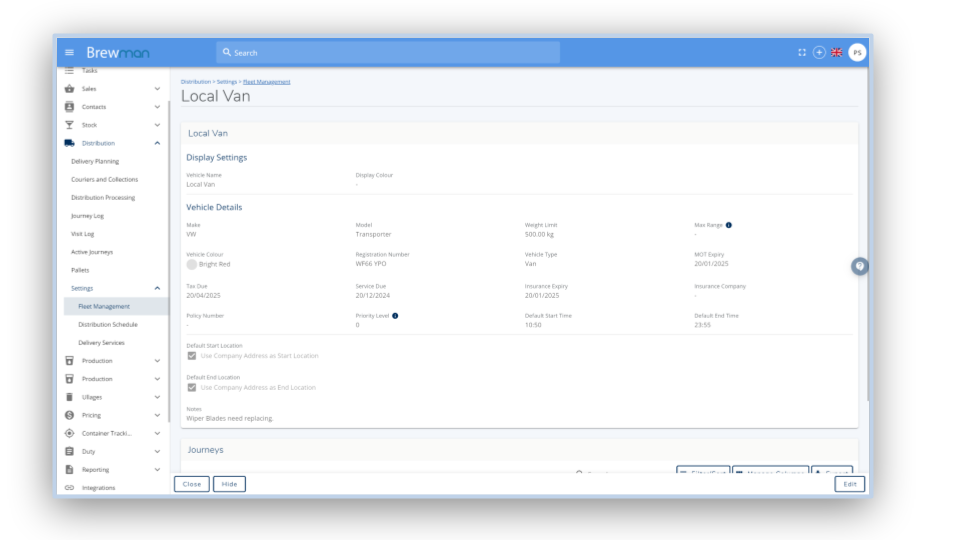
Fleet Management
To add a vehicle, go to Fleet Management and click Create Vehicle in the bottom right corner. As well as storing information about your vehicles, the system will utilise the following fields to automatically optimise your delivery routes in Distribution Planning; Weight Limit, Default Start Location, Default Start Time, Default End Location and Default End time.
The two compulsory fields are:
Vehicle Name - This will be the display name of the vehicle.
Weight Limit - This will limit the weight of products that the route planning software can add to this vehicle.
The optional fields are:
Display Colour - This will define the colour that is used for delivery planning and route lines on the map
Make - Enter the make of the vehicle for easy identification.
Model - Enter the model of the vehicle for easy identification.
Max Range - For electric vehicles, how far can the vehicle travel in a single charge. This will not affect optimisation but will show a warning if a journey is planned for this vehicle that exceeds it's Max Range.
Vehicle Colour - Enter assign the colour of the vehicle for easy identification.
Registration Number - Enter the registration number of the vehicle for easy identification.
Vehicle Type - Assign vehicle type, e.g. Van, HGV, etc. to the vehicle for easy identification.
MOT Expiry - Record the MOT expiry date as a reminder in the system.
Tax Due - Record when this vehicles road tax is next due
Insurance Expiry - Record when the insurance expires as a reminder in the system.
Service Due - Record when the next service is due as a reminder in the system.
Insurance Company - Record which company this vehicle is insured with for your reference.
Policy Number - This is used to state the insurance policy number of the vehicle for reference.
Priority Level - Enter a value from 1-100 to define which vehicle should be prioritised when optimising journeys. The higher the number, the greater the priority level.
Default Start Location - This informs the route planning software where the vehicle is expected to start its journeys. The tick box Use Company Address As Start Location is used to default this to the company address. If this is unticked you can enter an alternate address manually.
Default End Location - This informs the route planning software where the vehicle should go at the end of the journey. The tick box Use Company Address As Start Location is used to default this to the company address. If this is unticked you can enter an alternate address manually.
Default Start Time - This informs the route planning software what time the vehicle is expected to leave on its journeys.
Default End Time - This informs the route planning software what time the vehicle is expected to finish its journey.
Notes - Any additional information on the vehicle can be added here.
The vehicle list can be searched to find the vehicle you are looking for.
An existing vehicle can be edited or deleted.
Distribution Schedule
Once you have added your vehicles, you can then add the schedules. In the Distribution Schedule you can organise delivery routes and couriers.
To add a Delivery Area , click Edit in the top right of the Delivery card. You can enter the name of the Delivery Area , and select which days deliveries are made. In the list, you can edit the number of days it takes for the delivery to be made. When you have added all of your areas, click Save.
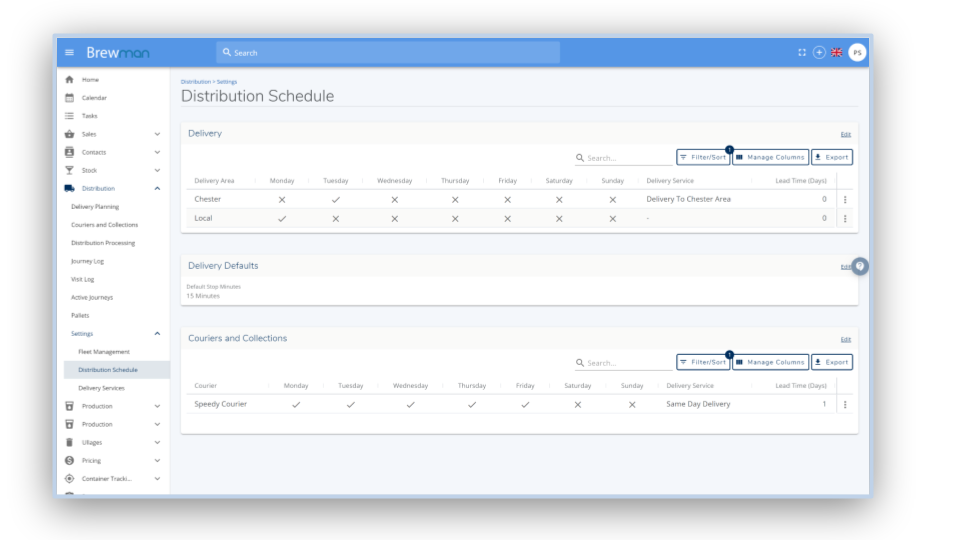
The Delivery Defaults card will allow you to allocate a default time to stops, and a delivery cost which will automatically apply to all delivered orders.
The Courier Collection card allows you to add the courier services you use. Click Edit in the top right of the card to add couriers. You can enter the name of the service provider, and select which days these collections will be made. In the list, you can edit the number of days it takes for the delivery to be made and the cost for this service. This will be added to all orders that have the courier selected. When you have added all of your couriers, click Save.

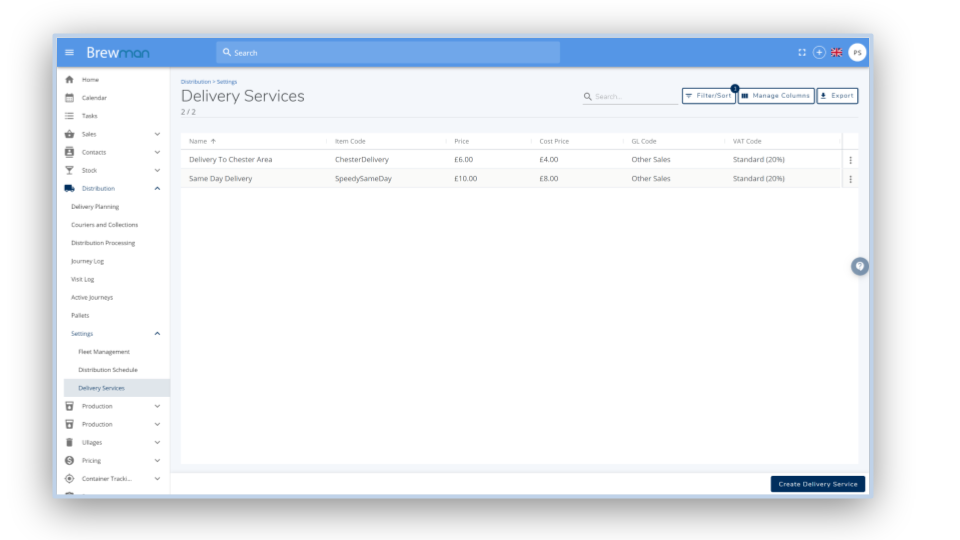
Delivery Services
You can also allocate Delivery Services to couriers which will automatically allocate delivery costs when this particular courier is used for an order. These are set up under the Delivery Services option below Distribution Schedule on the left hand menu.
Once created these can be assigned to different couriers under the Distribution Processing section.
-